How to use DYMO ID?
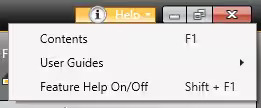
This article will provide you a reduced overview of the different features in DYMO ID and how to use them. You can access the complete online manual for your software from within DYMO ID. Go to the top right corner >> Help >> Contents.
Or from our website DYMO.com. Direct links to the extensive manual for the software can be found HERE and HERE.
Table of contents
- Finding the software version
- Setting up a label application in DYMO ID
- Working with Objects
- Working with Data
- Managing Files
Finding the software version
- Open the DYMO software.
- Navigate in the top left corner to ‘DYMO ID’.
- Select About >> About DYMO ID.
- The version is displayed in a pop-up screen.
Setting up a label application in DYMO ID
DYMO ID works with projects based on the desired label application. These rely on the selected device and tape type. The device used cannot be changed within the open project. To change between different devices and label applications, you must go back to Home each time.
Printer and label selection
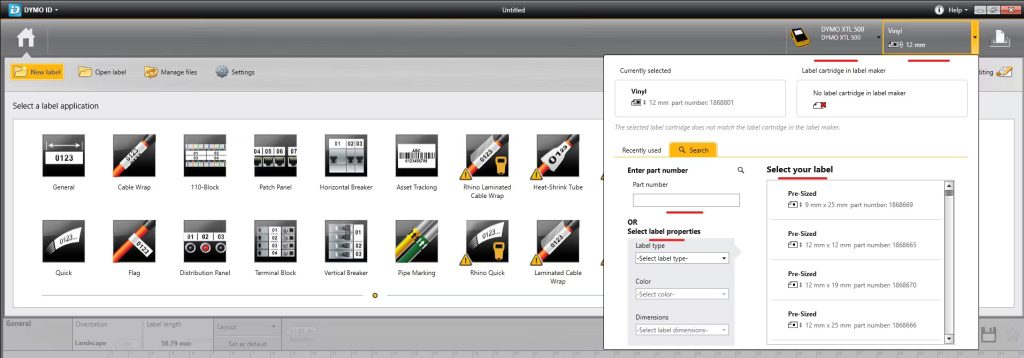
- You will start in the Home screen.
- On the top right, choose which installed printer you want to use.
- On the top right, choose which tape to use. Use the part number, tape properties or scroll through the list.
- Click on the desired label application below to open a project.
- At the top of the editing screen, you can change the properties.
- You are now ready to edit the label and print it.
Please note: When you are using an XTL device, the tape cartridge is automatically detected for you.
Please note: Each label application has its own label editor, but do share some of the same features. For a more detailed explanation of all the features, please refer to the online guide.
Working with Objects
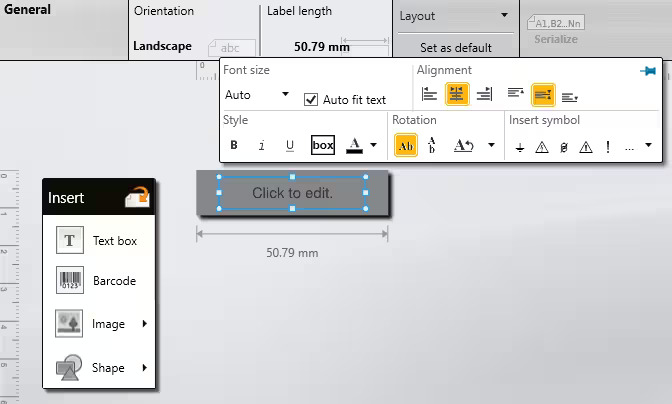
The label applications are pre-populated with at least one design object (usually a text box) to get you started creating your label quickly.
You insert objects from the Insert toolbar by dragging an object to the label or by selecting the object on the toolbar. Once displayed on the label, select or right click the object to get additional features, e.g. resize, move, arrange, group or delete.
When multiple objects are present on a label, the Select object tool appears below the toolbar.
Please note: Not all objects can be used in all label applications.
Editing a Text Box
- Single click on the Text Box to enter the text you want on the label.
- In the Formatting toolbar you can change the font size, the alignment within the text box, the text style and rotation.
- Select or right click the object to get additional features.
Supported barcodes and graphics
| Barcodes | Graphic formats |
|---|---|
|
|
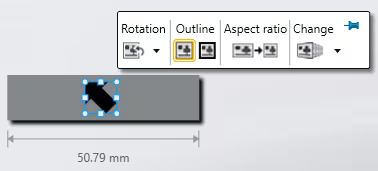
Inserting an Image
The image can be one of the images included with DYMO ID or you can insert an image you previously uploaded to the software. It will appear under the Custom category. Images tagged as favorite will always appear at the top of the image categories.
- Select Image from the Insert toolbar.
- Select the image you want to insert on the label.
- In the Formatting toolbar you can change the rotation, outline or the image itself.
- Select or right click the object to get additional features.
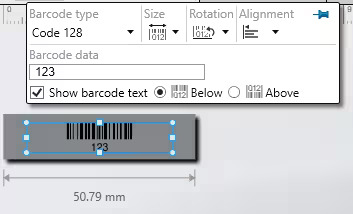
Inserting a Barcode
Please note: This documentation assumes that you already understand the differences between barcode types and have a plan in place to incorporate barcodes into your organization. If you need to learn more about barcodes, many excellent how-to books are available online, at local libraries, and at book stores.
- Select Barcode from the Insert toolbar. The barcode toolbar appears.
- Select the Barcode type. By default, the barcode type is Code 128.
- Under Barcode data, enter the data.
- In the Formatting toolbar you can change the size, rotation, alignment or show/hide the barcode text.
- Select or right click the object to get additional features.
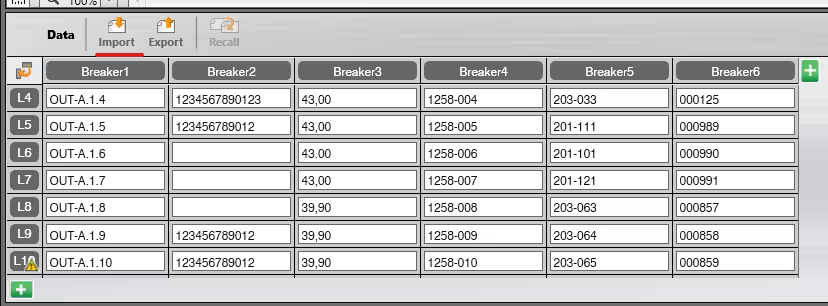
Working with Data
Most label editors have a data grid below the label preview area. It is arranged in rows and columns similar to a spreadsheet. You can enter data directly into the data grid or you can import data from an external spreadsheet or database file. This feature will allow you to create many labels at once without having to manually create each label individually.
Using Serialization
The Serialize feature is available in all the label editors except for Quick and Pipe marking. Serialization creates new labels or fills the existing cells on the label.
This feature will allow you to e.g.
- Auto-fill multi-cell labels such as patch panel, breaker, distribution panel, 110-block, or terminal block labels. The cells are filled by each increment in the series. If necessary, additional cells are created.
- Create a series of labels by incrementing the data. A new label is created for each increment in the series.
You will be able to view the series on the label as you are adding and changing the values. The data grid is also populated with the serialized data.
To create a series:
- Place the cursor in a text field or select a barcode.
- Click Serialize at the top of the editing screen. The Serialization tool appears
- Select the character to serialize by 1) drag the handles to select one or more characters, 2) click another character to add it to the sequence, 3) Click the red cross to delete a character from the sequence.
- For each character, select values for Increment by and Count.
- Select Apply when finished.
To create a sequential series:
- Place the cursor in a text field or select a barcode.
- Click Serialize at the top of the editing screen. The Serialization tool appears.
- Select the character to serialize by 1) drag the handles to select one or more characters, 2) click another character to add it to the sequence, 3) Click the red cross to delete a character from the sequence.
- Select the Serialize sequentially check box.
- Reorder the sequence by dragging or using the arrows at the bottom.
- For each character, select values for Increment by and Count.
- Select Apply when finished.

Importing Data
You can import data from Microsoft Access, Microsoft Excel, Text – Comma Separated Values or Tab-delimited files with a *.csv or *.txt extension, Universal Data Links (*.UDL).
When you import data from an external file, the data is automatically added to the data grid in the same layout as the source file. For example, a 24-column spreadsheet will be imported as 24 columns in the data grid. You can then map the columns in the data grid to objects on your label.
For some multi-cell label types, if the number of columns being imported matches the number of cells defined for the label, then the data is automatically mapped to the cells on the label. For example, if a spreadsheet with 12 columns of data is imported into a 12-port patch panel label, then the data will be automatically mapped to the cells on the label.
- Click import in the Data editor at he bottom of the screen.
- The Data import dialog box appears.
- If not already selected, click From a file.
- Under Select data file, click Browse. The Open dialog box appears.
- Select the database file to import, and click Open. The data from the selected file is displayed in the Preview area.
- To keep the data linked to the file, select the Keep file linked check box.
- If the database file you selected contains more than one sheet or table, select the sheet or table that contains the data you want to import from the Select sheet or table list.
- If the first row in the database file contains column headers, select the Use first row as column headers check box.
- Preview the data to import in the Preview area.
- Click Import. The data is imported and displayed in the Data editor.
Please note: Imported data can be edited once in the data grid. However, if the imported data is linked to the source file, the data can only be edited in the source file.
Mapping Data
Each column in the data grid can be mapped to a text box or barcode object (or both) on a label. Each row in the data grid represents a single label.
To map data to a text box:
- Select the column heading in the data grid.
- Drag the column heading to the position in the text box where you want the data to appear.
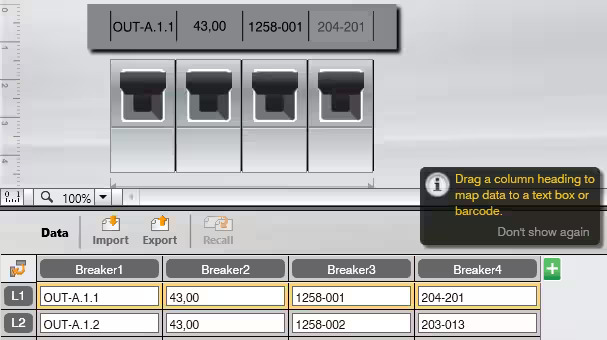
To map data to a barcode:
- Add a barcode object to the label.
- Drag a column heading to the barcode object. The data in each row automatically populates the barcode data field.
Managing Files
This feature allows you to create labels in DYMO ID, transfer them to the device and print the labels on demand later from the label maker. You can also update and transfer new label templates.
Please note:
- For XTL label makers you can transfer label files and custom images.
- For Rhino 6000+ printer you can transfer simple label files.
Transferring Labels
- Click on the Home button.
- Select the label maker you wish to manage.
- Click Manage files.
- Click My labels.
- In the left panel, locate the desired location on your computer.
- Click the arrow(s) between the two panels to transfer the files to or from the device.
Please note: for the Rhino 6000+ you can only transfer to the label maker.
Transferring Custom Images
- Click on the Home button.
- Select an XTL label maker you wish to manage.
- Click Manage files.
- Click My images.
- Click the plus sign at the top of the left panel.
- Locate the image you want to add from your computer and click Open.
- Additionally, you may transfer custom images to or from an XTL label maker using the arrows.
Please note: Custom Images are a feature exclusive to the XTL label makers.
![]()
![]()