What should I know about the DYMO add-ins?
Some of the DYMO software may provide add-ins directly built into third party software, such as Microsoft Office, QuickBooks or ACT!. This article will explain which add-ins exist, where to find and how to use them.
Please note: DYMO Label v.8 is now discontinued, and we cannot guarantee the add-ins will work properly in these third party applications, nor can DYMO Consumer Service assist with the user settings for these third party applications.
Contents
Microsoft Office
Which Microsoft Office software includes add-ins?
-
- DYMO Connect for Desktop includes an add-in for Word and Excel. The Excel add-in is currently only available on Windows operating systems.
- DYMO Label software v.8 includes add-ins for Word, Excel and Outlook.
Please note: DYMO Label software v.8 is obsolete software, and we cannot guarantee the add-ins will still properly launch.
Which versions of Microsoft Office Suite include add-ins?
-
- On Windows
- All DYMO Connect versions (Windows 8.1 or higher) include an add-in for Microsoft Word 2016, 2019, and 365. Starting with DYMO Connect 1.4.4.17 the Excel add-in is also introduced.
- DYMO Label v8 (version 8.5.4 or later, Windows 7 – 10) includes add-ins for Microsoft Office 2010, 2013, and 2016.
- On Mac
- All DYMO Connect versions (macOS 10.14 or higher) include an add-in for Microsoft Word 2016, 2019, and 365.
- DYMO Label version 8.7.5 (macOS 10.14 – macOS 11) includes add-ins for Microsoft Office 2016, 2019, and 365.
- DYMO Label version 8.5.4 up to 8.7.3 (prior to MacOS 10.14) includes add-ins for Microsoft Office 2013, and 2016
- On Windows
How do I install the DYMO add-in for Microsoft Office?
-
- DYMO Connect
The DYMO Connect Add-in for Microsoft Word (Windows + Mac) and Excel (Windows only) is automatically installed along with the software and is powered by our DYMO Connect Web Service. - DYMO Label v.8
The DYMO Label Add-in for Microsoft Word, Excel and Outlook is automatically installed along with the software. These are stand-alone add-ins and only require DYMO Label v.8 to be installed.
- DYMO Connect
How do I launch the DYMO add-in for Microsoft Office?
-
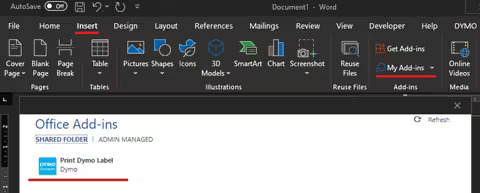
- DYMO Connect add-in for Word and Excel
It can be accessed by selecting Insert > My Add-ins > Shared Folder > DYMO Label. Please note, the DYMO Connect Web Service must be running for the Add-In to work. Once launched you will find the Add-in on the Home tab.
- DYMO Connect add-in for Word and Excel
DYMO Label v.8 add-in for Word
-
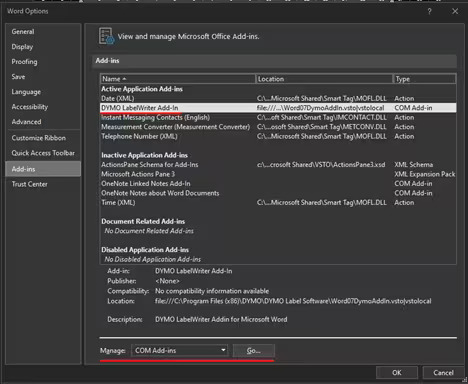
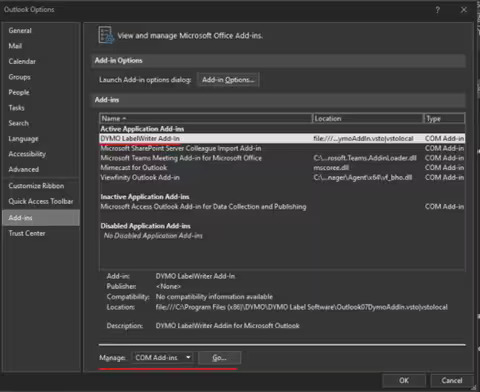
- For Windows
It can be accessed through File > Options > Add-ins. If not yet active, select Manage: COM Add-ins > GO > tick the DYMO LabelWriter Add-in > OK. Once launched you will find a separate DYMO Label tab in the top ribbon.
- For Windows
-
- For Add-ins compatible with Office 2019 and 365, you must have the latest version of DYMO Label Software installed.
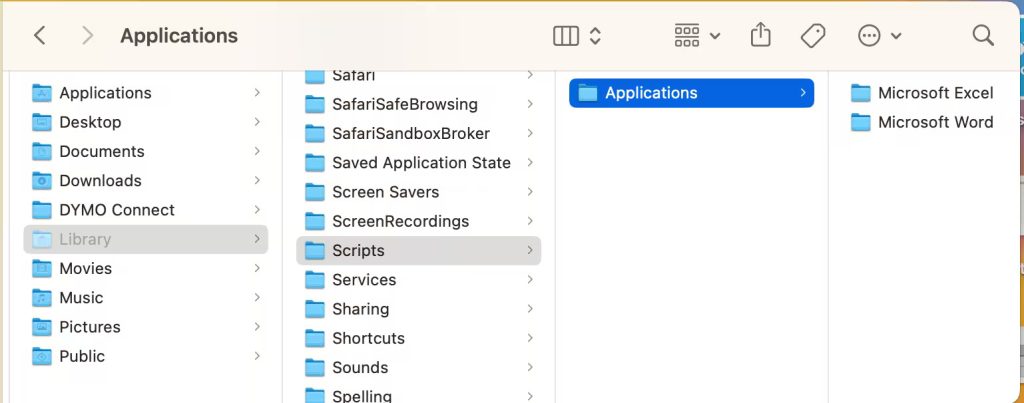
- For MacOS
It can be accessed through the Scripts menu. Run the script for the DYMO Word Add-In dialog box to appear. Please, make sure to first select the content you want to print before launching the script.

DYMO Label v.8 add-in for Excel
-
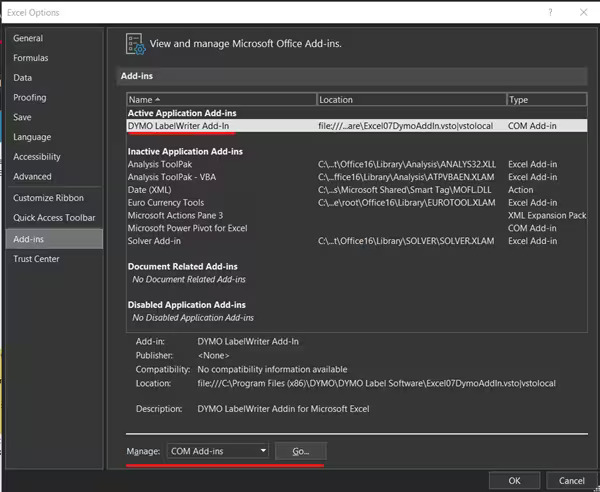
- For Windows
- It can be accessed through File > Options > Add-ins. If not yet active, select Manage: COM Add-ins > GO > tick the DYMO LabelWriter Add-in > OK. Once launched you will find a separate DYMO Label tab in the top ribbon.
-
- For Add-ins compatible with Office 2019 and 365, you must have the latest version of DYMO Label Software installed.
- For MacOS
It can be accessed through the Scripts menu. Run the script for the DYMO Excel Add-In dialog box to appear. Please, make sure to first select the content you want to print before launching the script.
DYMO Label v.8 add-in for Outlook (Windows only)
It can be accessed through File > Options > Add-ins. If not yet active, select Manage: COM Add-ins > GO > tick the DYMO LabelWriter Add-in > OK. The DYMO Label tab will only display within the ‘Contacts’ folder that can be found in the lower left panel.
DYMO Label v.8 add-in for Mac Contacts
It can be accessed directly in the Mac Address Book by selecting the contact that you want to print a label for. Make sure that the contact is not displayed in edit view. Right-click the contact address to print, and then choose Open in DYMO Label. The DYMO Mac Address Book Add-In dialog box appears.
How do I manually install or launch the DYMO add-in for Microsoft Office?
Please note: only the add-ins for DYMO Label v.8 can be found locally on the computer. If you cannot find the add-ins in the Options you may have to install the add-ins manually as explained below.
-
- On Windows
-
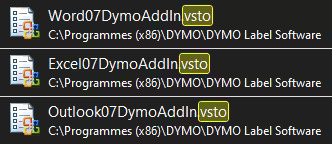
- Navigate to C:\Program Files (x86)\DYMO\DYMO Label Software
- Depending on the add-in, look for:
- Excel07DymoAddIn.vsto
- Outlook07DymoAddIn.vsto
- Word07DymoAddIn.vsto
- Double-click on it in order for it to launch and install itself. Then open the desired software. Possibly you will have to perform the previous steps.
-
- On MacOS
-
- Navigate to SSD or Macintosh HD/Library/Frameworks/DYMO/DLS8/Addins
- Depending on the add-in, look for:
- DYMO Excel Add-in
- DYMO Word Add-in
- Double-click on it in order for it to launch itself. The Add-In dialog box will appear.

How do I remove the DYMO add-in for Microsoft Office?
-
- On Windows
If you want to deactivate the DYMO Add-in, please follow the previous step and untick the option or disable the LoadBehavior key in the Registry Editor.
- On Windows
-
- Click on “Start”, then click the search bar and type regedit.
- Locate and alternate the following registry keys:
- HKEY_CURRENT_USER\Software\Microsoft\Office\Excel\Addins\DYMO.LabelWriterAddIn
- HKEY_CURRENT_USER\Software\Microsoft\Office\Outlook\Addins\DYMO.LabelWriterAddIn
- HKEY_CURRENT_USER\Software\Microsoft\Office\Word\Addins\DYMO.LabelWriterAddIn
- Set value from 3 to 0 to disable the add-in from being loaded during start up.
-
- If you want to remove the DYMO add-in for Word/Excel/Outlook, please delete the following Registry keys.
-
- Click on “Start”, then click the search bar and type regedit.
- Locate the following registry keys. Each of them might contain DYMO.LabelWriterAddin. Please delete the DYMO.LabelWriterAddin key.
-
- For Excel
- HKEY_CURRENT_USER\SOFTWARE\Microsoft\Office\Excel\Addins
- HKEY_CURRENT_USER\SOFTWARE\Microsoft\Office\Excel\AddinsData
- HKEY_LOCAL_MACHINE\SOFTWARE\Microsoft\Office\Excel\Addins
- For Excel
-
- For Outlook
- HKEY_CURRENT_USER\ SOFTWARE\Microsoft\Office\Outlook\Addins
- HKEY_CURRENT_USER\ SOFTWARE\Microsoft\Office\Outlook\AddinsData
- HKEY_LOCAL_MACHINE\SOFTWARE\Microsoft\Office\Outlook\Addins
- For Outlook
-
- For Word
- HKEY_CURRENT_USER\ SOFTWARE\Microsoft\Office\Word\Addins
- HKEY_CURRENT_USER\ SOFTWARE\Microsoft\Office\Word\AddinsData
- HKEY_LOCAL_MACHINE\SOFTWARE\Microsoft\Office\Word\Addins
- For Word
-
- NOTE: For 64-bit systems, it can also be under these ones. Please delete the Excel/Outlook/Word key
- HKEY_LOCAL_MACHINE\SOFTWARE\Wow6432Node\DYMO\LabelWriter\OfficeAddIn
- HKEY_LOCAL_MACHINE\SOFTWARE\Wow6432Node\DYMO\LabelWriter\OfficeAddIn
- HKEY_LOCAL_MACHINE\SOFTWARE\Wow6432Node\DYMO\LabelWriter\OfficeAddIn
- NOTE: For 64-bit systems, it can also be under these ones. Please delete the Excel/Outlook/Word key
On MacOS
If you want to remove the DYMO add-in for Word/Excel, please delete the following references.
-
- Navigate to SSD or Macintosh HD/Library/Frameworks/DYMO/DLS8/Addins.
- Depending on the add-in, remove DYMO Excel Add-in or DYMO Word Add-in.
- From Finder, click on Go and while holding the Option key, please select Library.
- Navigate to Scripts/Applications.
- Depending on the add-in, remove DYMO LabelWriter.scpt in the appropriate folder.
QuickBooks (US only)
Please note: only DYMO Label v.8 provides an add-in for QuickBooks for Windows.
DYMO Connect is not compatible with QuickBooks.
Which versions of QuickBooks include add-ins?
-
- DYMO Label Software v.8 is compatible with locally installed QuickBooks 2007 – QuickBooks 2018, Professional and Premier editions only. The cloud/online version is not supported.
How do I install the DYMO add-in for QuickBooks?
-
- The DYMO Label Add-in for QuickBooks is automatically installed along with the software.
Please note: when installing the DYMO add-in for Quickbooks, it is required the installer to be run as the administrator, as well as opening the Quickbooks software as administrator to allow the DYMO Label Add-in access to that company file.
How do I launch the DYMO add-in for QuickBooks?
-
- It can be accessed through Invoices, Sales Receipts, or Purchase Orders function > File > Print DYMO Label > Print Single Label. The DYMO Label Add-In dialog box appears.
- The first time you open each company file after installing DYMO Label software, a dialog box appears asking you to allow the add-in access to your data files. You must enable the add-in for each company file to allow the add-in access to your QuickBooks data for that file.
- If the Print DYMO Label button does not appear after installing the software as administrator, please do the following:
-
- Open QuickBooks.
- Click Edit and select Preferences.
- In the Preferences window select Integrated Applications.
- Click on the Company Preferences tab. Ensure a checkmark, under the Allow Access column, appears next to the Print DYMO Label application.
- Click OK. Exit and re-open QuickBooks.
How do I remove the DYMO add-in for QuickBooks?
-
- The DYMO Label Add-in for QuickBooks can be deactivated by following the previous step and untick the option.
ACT! (US only)
Only DYMO Label v.8 provides an add-in for ACT! for Windows.
Which versions of ACT! include add-ins ?
-
- DYMO Label Software v8 is compatible with U.S. installations of ACT! 2007(v.9), 2008(v.10), 2009(v.11), 2010(v.12), and 2011(v.13), 2012(v.14), 2013(v.15), 2014(v.16), 2015 (v.17), 2016, (v.18), 2017 (v.19).
How do I install the DYMO add-in for ACT!?
-
- The DYMO Label Add-in for ACT! is automatically installed along with the software.
How do I launch the DYMO add-in for ACT!?
-
- It can be accessed through the Tools menu. The DYMO ACT! Add-In dialog box appears. Please, make sure to first select the content you want to print before launching the add-in.
I am running ACT! over a network. Is the LabelWriter Add-In for ACT! compatible with this setup?
-
- The DYMO add-ins were designed for local installations of ACT! only and therefore we cannot guarantee this setup method will work. Due to differences in network configurations DYMO Consumer Service is not able to support such setups.
How do I remove the DYMO add-in for ACT!?
-
- The DYMO Label Add-in for ACT! can be deactivated by following the previous step and untick the option.
![]()