How do I set up my LabelWriter Wireless?
LabelWriter Wireless setup
The DYMO LabelWriter Wireless printer has an option for USB and WiFi connectivity. For a USB connection, please make sure that our DYMO software is installed on your computer and connect the printer to a USB port on your system.
To configure your device wirelessly, please feel free to view our video guide which will walk you through the process of the printer configuration.
Alternatively, please follow the steps below:
First of all I would like to suggest that you check the radio type or protocol that your router uses.
- On Windows you can check this in the network properties of your wireless network and look for protocol.
- On Mac, press the OPTION key and then click on the Wi-Fi icon in the Mac menu bar. There you should look for PHY mode.
If this is 802.11 b/g/n, your network is compatible with the LabelWriter Wireless.
If it is 802.11ac/ax, unfortunately your network is officially not compatible with the LabelWriter Wireless and we cannot guarantee the device can be set up on it. In that case we advise you to contact your internet provider to see if the router can be made compatible with the b/g/n radio type.
If your router uses the 802.11 b/g/n radio type, please follow the instructions below.
If you previously requested to configure your device. Please reset it first. This can be done as follows:
- Make sure the power is on. If you just pressed the power button, wait 30 seconds for the printer to fully boot up.
- Using a pointed object, not metal, press and hold the RESET button on the back of the printer for at least five seconds.
- After five seconds, release the RESET button to initiate printer reset.
After about 30 seconds, you can connect the printer to a wireless network.
Connecting the printer using the Quick Setup Wizard
Verify that you have the password and login credentials required to connect the printer to the wireless network. If in doubt, contact the administrator of the wireless network. If you want to connect the printer to a corporate or enterprise network, ask the wireless network administrator for help.
1. Please make sure your power light is solid, and the WiFi light is glowing.
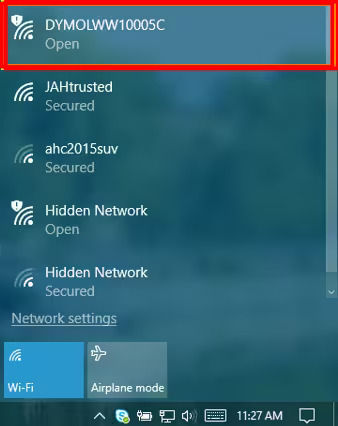
2. Using your Mac/Windows laptop or mobile device, connect to the wireless network named DYMOLWWxxxxxx. This unique name can be found on the bottom of the printer next to SSID (if this network isn’t found, reset the LabelWriter Wireless using the steps in the user manual on page 10).
3. Once connected, open a web browser and enter 192.168.58.1 ( or http://192.168.58.1) to the URL bar.
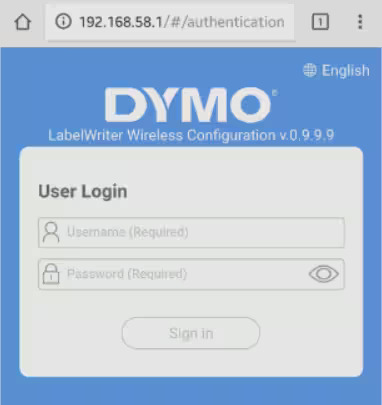
4. Log in to the LabelWriter Web Configuration utility using the following:
- Username: admin
- Password: admin
5. On the name your printer page select Next.
6. On the Connect Your Printer page select DHCP (recommended) or Static if there’s a reserved IP address for the device. Click Next.
Please note, we do not support static connections.
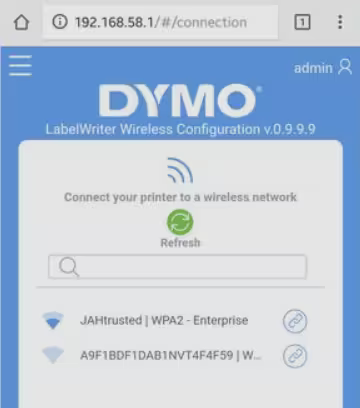
7. On the Connect Your Printer to a wireless network page, select your wireless network from this list, and enter the password for your network when prompted. If you do not see your wireless network, click Refresh, and wait a few seconds to see if it appears. Also verify the correct name of the wireless network you are searching for.
8. Once you’ve entered your network credentials. it will have a loading page that says connecting. This process may take a few seconds or minutes. You should receive a “success” message with a new IP address for the LabelWriter Wireless. Please make a note of this IP as you may need it to install the printer manually. Reconnect your computer to the same wireless network you configured the LabelWriter Wireless for.
Your printer is now configured. To install your printer, please open our DYMO software and navigate to File and select ‘Add network printer’. The software will search for the printer and allow you to install the device on your computer.
If you have Windows and the printer does not show up in the list, please check if your computer has the Bonjour software installed. This is necessary to establish a wireless connection to our device. If the software cannot be found in the list of installed software, download it HERE.
Restart the computer after installing the Bonjour software. Then open our DYMO software and navigate to File and select ‘Add network printer’.
![]()